
Growing up we had a fabric advent calendar with a little Christmas tree that you moved into each pocket to count the days until Christmas. I remember being so excited about moving it closer to Christmas and rushing to be the one that got to move the tree. I have been wanting to make my own for years but it’s so hard to find time to make Christmas decorations in November and December, and I just don’t have the motivation to make them any other time of the year. So when Laura from Bugs and Fishes announced that she was doing another Crafty Christmas Tutorial Link Up this year, I knew it was the perfect chance to finally make one!
I wanted to add some non traditional Christmas colors into the mix to give it a more modern feel, but I choose any color configuration you would like! I think it would be great with just red and green too! I made sure to use a good quality wool felt because I wanted to make sure it would last longer than a cheaper acrylic felt.

You’ll need:
25 3″ squares of wool felt in whatever colors you choose – I ordered the 5 9×12 sheets from Benzie Felt and I have a ton left over. I used the colors Julep, Ochre, Carmine, Flamingo, Emerald.
Wool felt about 20″x26″
1/8 yard white wool felt for scallops, numbers, and tabs.
Coordinating colors of embroidery floss
Fabric glue
Ruler
Water soluble marker
Dowel rod
Bakers twine or other string for hanging
Templates – download here

First get together all your pieces. I cut the felt into 3″ squares using a rotary cutter and quilting ruler. Download the template with the numbers and cut them out. You will need to cut out thirteen #1, nine #2, three #3, 4, and 5, and two #6, 7, 8, 9, and 0.

I attached all of the numbers to the squares using a very small amount of fabric glue. Don’t use too much or it will ooze out of the edges, but use enough that it will stay in place. Whip stitch around the edges of the numbers using two strands of white embroidery floss.

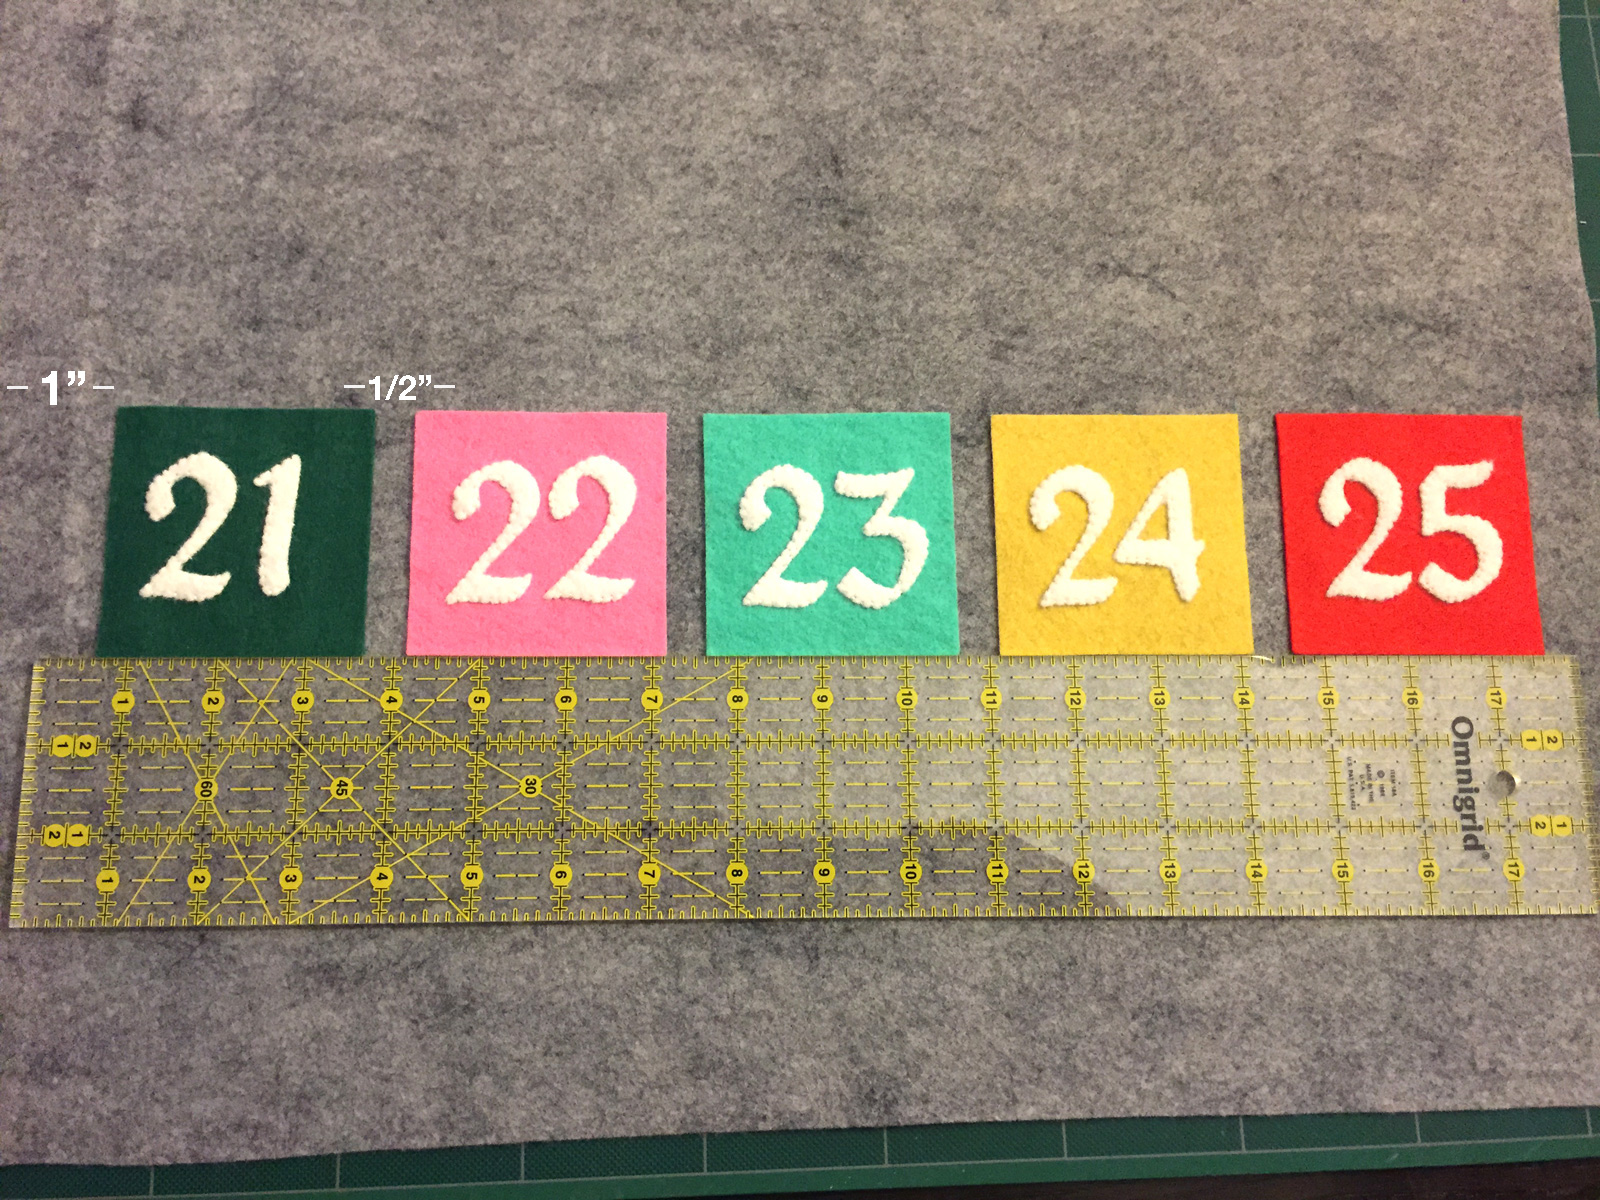
I found it easiest to start at the bottom and work my way up while placing the squares. There is a 1″ margin on each side of the calendar, and 1/2″ in between the squares. Starting 4″ from the bottom, start laying out your squares.

I found it easiest to get the first square placed and then use a water soluble marker to mark 1/2″ to the right. I kept a ruler in positioned underneath to ensure everything was lined up straight.

I worked slowly attached each square as I went with a small line of fabric glue around the sides and bottom. (make sure you don’t glue the top or it won’t be a pocket!)

Using the coordinating thread colors, attach the pockets with a running stitch around the edges.

Use the template and cut out the scallops. You will need to tape pieces together to make the width long enough. Instead of attempting to line up the felt edges, I found it easier to leave extra grey fabric on the background and then trim it once the white felt was attached. Use the fabric glue around the edge of the scallop and do a running stitch around the edge.

Cut 2″x3″ strips of white felt for the top tabs. I folded the strip in half and pinned them to the back of the calendar, about 1/2″ from the edge. Make sure you attach them all evenly so that the dowel hangs straight. I didn’t glue the tabs down, I just used a running stitch to sew all the pieces together.

I attached the two on the far right and left, then found the center point and attached one there. For the final two, I found the middle point between the tabs and attached it there. It ended up being about 2″ in between each one.

Cut the dowel down to 22″ and mark a line 1/2″ from each edge. Create a groove on the 1/2″ mark either using pliers or a saw, just make sure you don’t cut all the way through.

You only need to cut a tiny fraction of an inch for the string to fit into so it doesn’t slide around. I used a piece of bakers twine that was about 32″ but you can go longer or shorter depending on how you want it to hang on the wall.
Give it a good ironing, and there you go! You could put candy or ornaments in the pockets that you would take out each day or you can make something to move each day. Evie is already very, very excited to use the calendar and keeps asking if it’s Christmas yet.
Download the PDF template for the numbers and scallop design
Check out the free patterns to download here, and patterns to purchase here at my Etsy.
Check out all the other patterns in the crafty tutorial link up here!
This is absolutely adorable, and your craftsmanship is exquisite. I love how simple and modern this design is. Bravo!!
Thanks so much! This has been something I’ve wanted to do for so long and I’m so happy with how it turned out!
A great design. I love the little pockets. We always had a candy in each pocket. I can see all kinds of potential. Thanks for a great tutorial.
I still haven’t decided if I’ll do candy or an object that gets moved. Or maybe ornaments to hang every day. I guess I still have a few weeks to make up my mind!
It looks so great. What perfect little stitches.
Thanks so much! I think I probably could have made the project go faster if I machine sewed the pockets on, but I love the look of the hand embroidery!
It’s adorable! I love your colour choices.
Thanks so much! I really love adding the other colors to the traditional red and green. It still feels Christmasy but with a fun spin!
Cute!!! I mentioned in my other comment that I’m making two advent calendars (but they’re chipboard kits I’m decorating with scrapbook papers and such). Growing up, we had a felt calendar like this with a little bell we would move each day. 🙂
Oh! A bell is a great idea for the pockets! 🙂
I really love this! Its so bright and fun.
Muito lindo! Obrigada por compartilhar suas ideias! 🙂
eeeek,,just saw this on the Sew Mama Sew handmade holidays list for “Gifts to deck the Hall”,,Congrats!!